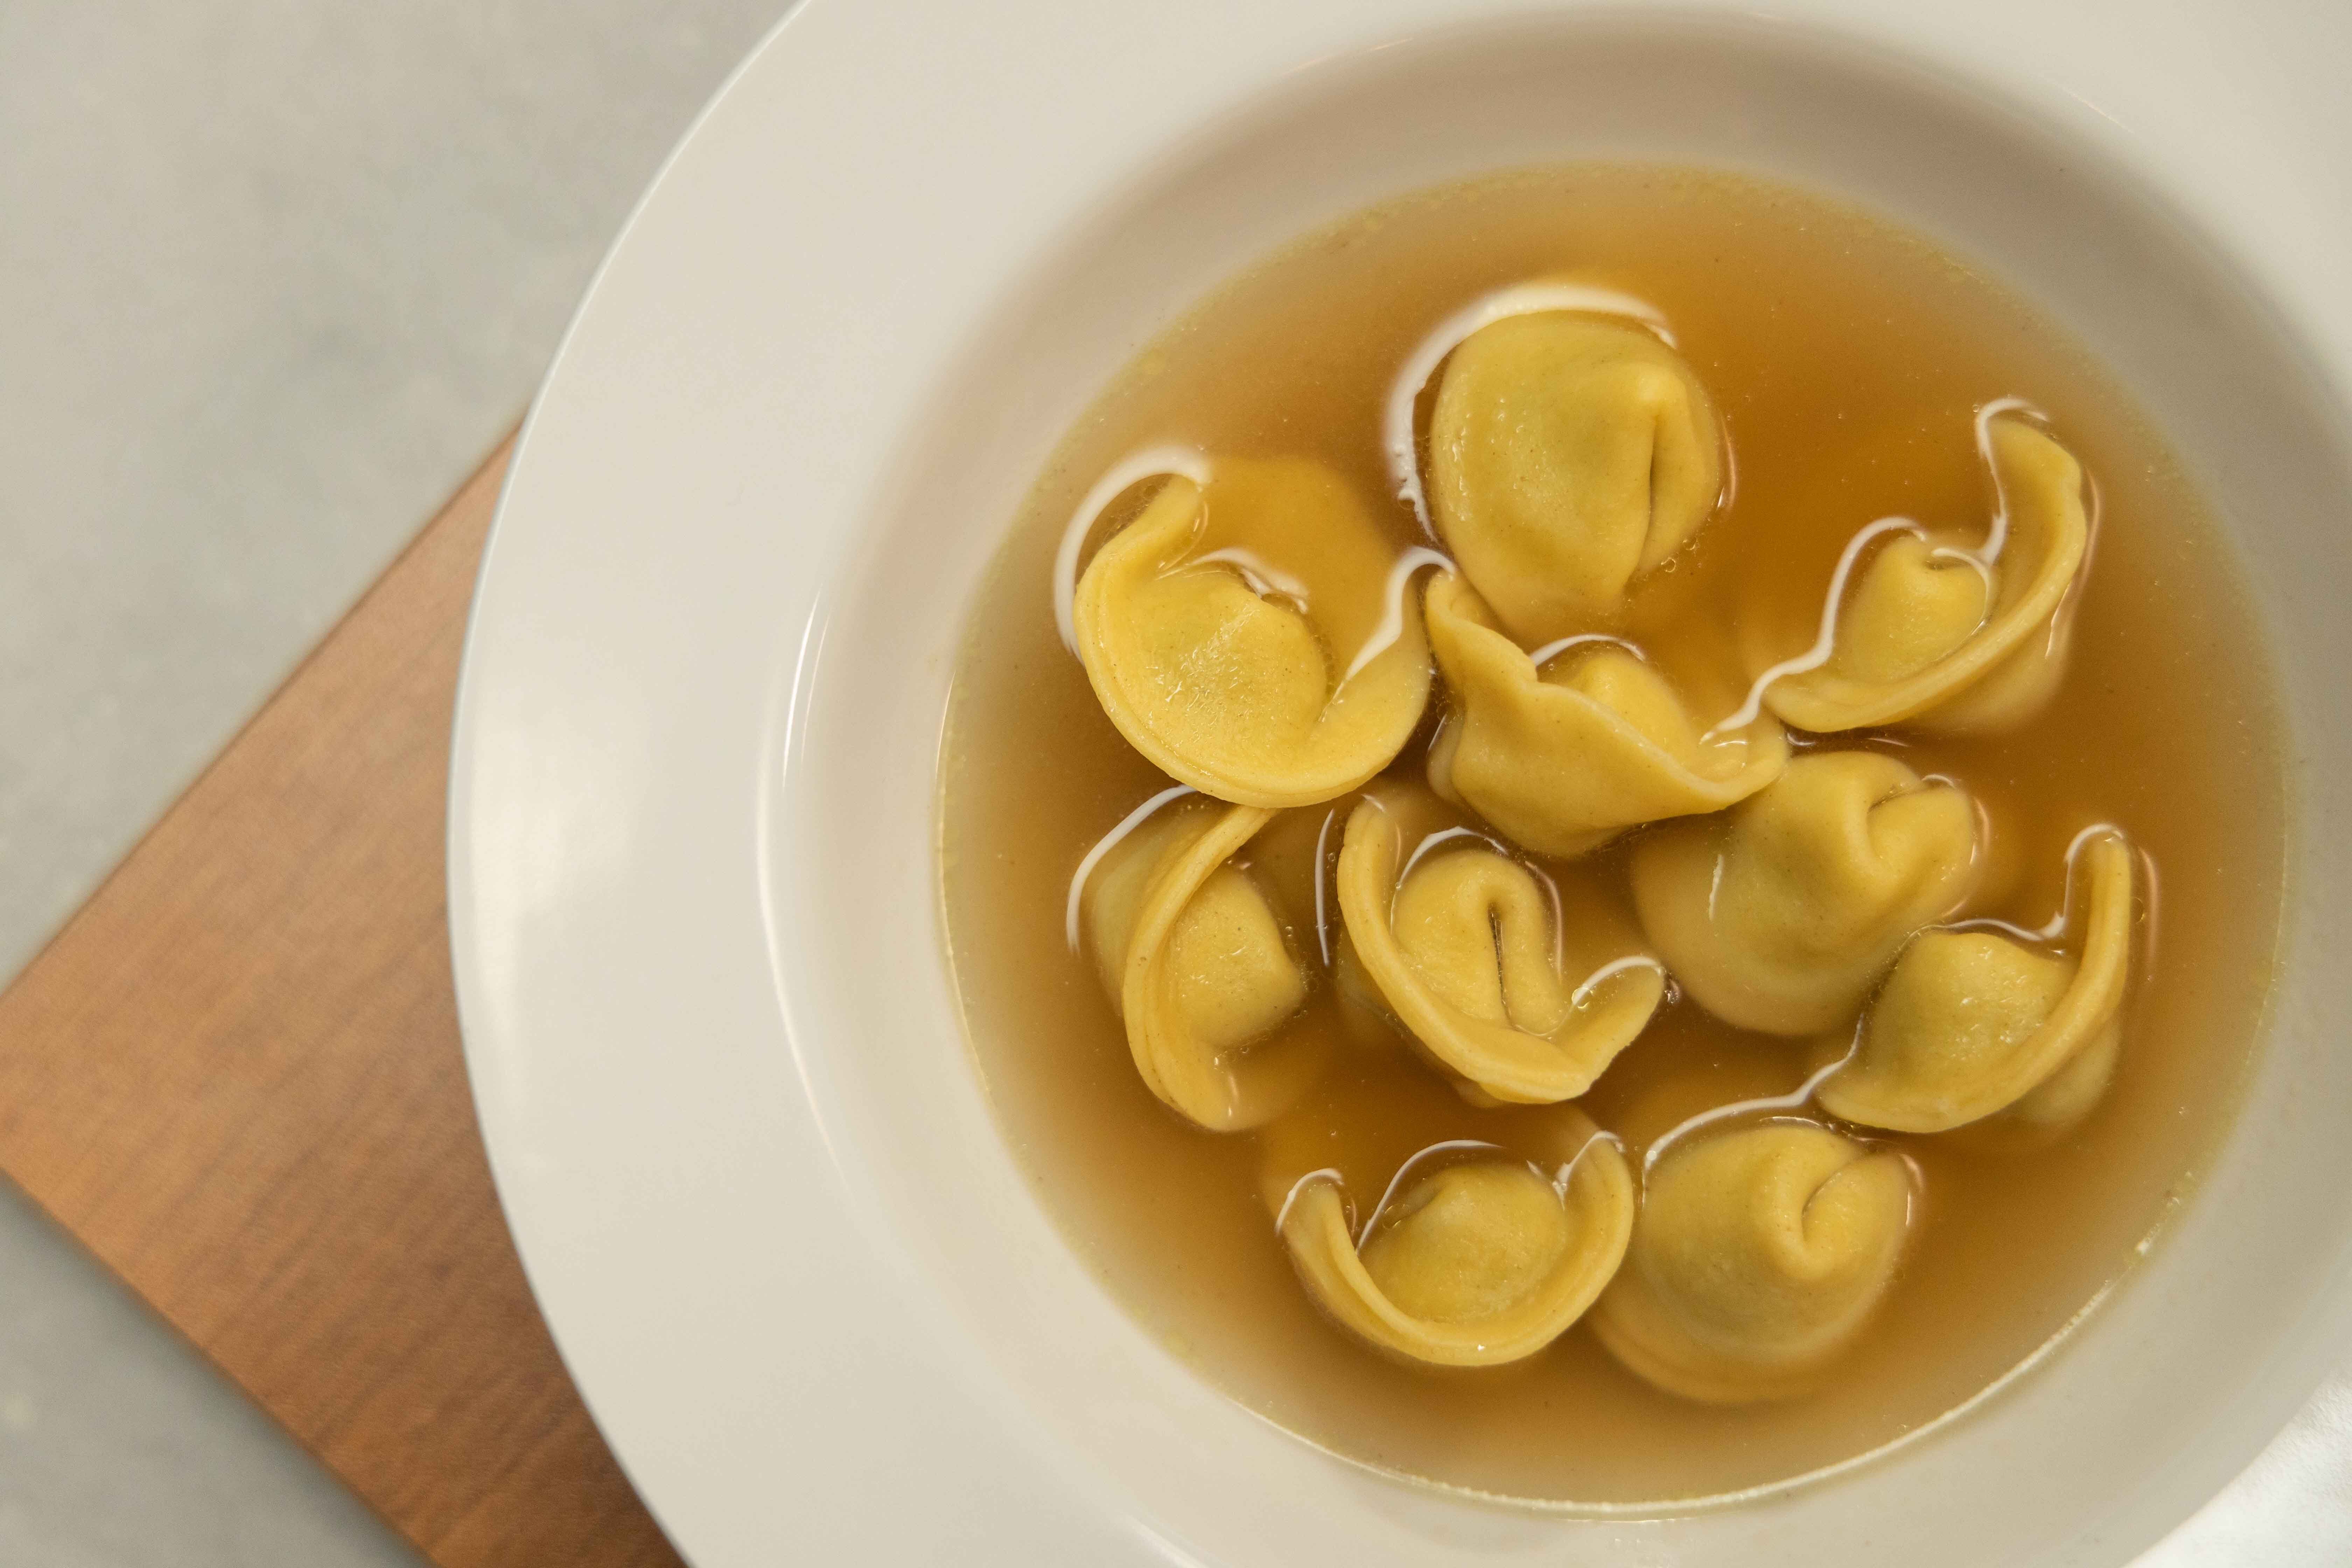
Cappelletti with Summer Corn & Basil Filling in Corn Broth
Adapted from PASTA EVERY DAY by Meryl Feinstein. Copyright © 2023 by Meryl Feinstein. Photographs by Nico Schinco. Used with permission of Voracious, an imprint of Little, Brown and Company. New York, NY. All rights reserved.
You can purchase PASTA EVERY DAY here
Ingredients:
350 grams (2 ¼ cup) 00 or all-purpose flour
50 grams (5 tablespoons) semola rimacinata or semolina flour
100 grams (about 2 large) eggs
135 grams (about 8 large) egg yolks
15 ml (1 tablespoon) water, plus more as needed
Method:
- Weigh and combine the flours in a wide mixing or serving bowl. Weigh the liquids and whisk them together until smooth.
- Keep the flour in the bowl (this prevents runaway liquids) or turn it out onto a work surface. Make a wide “well” in the center with your fist, forming a wall of flour tall enough on all sides to contain the liquid. Pour the liquid into the well.
- Using a fork, gradually incorporate a portion of the flour, a couple of teaspoons or so at a time, from the inner rim of the well into the liquid in a circular motion (à la scrambled eggs) until a thick, custardy batter forms. You’ll use only about a quarter of the flour at this point; the majority will remain loose.
- Incorporate the remaining flour into the thickened liquid, either by 1) pulling, folding, and pressing the flour into the center with your hands until becomes a shaggy ball; 2) vigorously whisking the liquid and loose flour together with the fork until all the liquid is evenly distributed (and it looks like little flaky pebbles); or 3) if you’re working on a flat surface, cutting the flour into the liquid with the help of a bench scraper. If it looks like a total mess–sticky her, flaky there– you’re doing it right.
- If you’ve been using a bowl, transfer the mixture to a flat surface, along with any large flaky pieces. It’s also totally normal to have some flour left behind.
- Knead the dough vigorously however works best for you (don’t be shy; you can’t overwork it). I like to push it forward with the heel of my hand, then fold it over on itself about halfway. Do this a few times in one direction, then rotate the dough 90 degrees and repeat, shifting 90 degrees every few strokes. Once the dough starts to come together, brush away any remaining flaky pieces. Always give it time before adding flour or water–- more often than not, it will sort itself out after a few minutes. Then, if the dough still feels dry, add a small amount of water with your fingers to the dry areas and knead until smooth, repeating as necessary; if it feels very soft and sticky, work in more flour until it firms up.
- After about 5 minutes, cover the dough tightly and completely in plastic wrap or under an overturned bowl (you can also clean a shower cap or snug Tupperware container). Let it rest for 5 to 10 minutes—have a cup of coffee, a snack, a glass of wine—then uncover and knead the dough until it’s smooth and firm, pliable but not soft, 3 to 5 minutes more. (This two-part knead makes the dough smoother; if preferred, skip the first rest period and knead the dough for about 10 minutes.)
- When it bounces back from a light touch to the surface, cover the dough tightly and completely once more. Let it rest at room temperature for about 30 minutes.
- Set up your workspace: Dust a sheet pan with semolina or line it with a dishcloth. Gather your tools and set up your pasta machine.
- Cut off a quarter of the dough and keep the rest covered. Keep extra 00 or all-purpose flour nearby.
- Set your pasta machine to its widest setting. For a Marcato Atlas 150, that’s setting 0; for most KitchenAid attachments, that’s setting 1.
- Flatten the dough with your palm into a rough oval—smush it between your fingers if you need to, or use a rolling pin to roll it into an oval that’s about ¼ inch (6mm) thick. Position one of the dough’s tapered ends in the center of your pasta machine and roll it through once. (If you’re using the KitchenAid attachment, don’t run the motor too fast; I usually prefer speed 2.) You should now have a longer oval-ish shape.
- Rotate the dough 90 degrees, so the tapered ends run horizontally. Fold the ends toward the center like an envelope so that the width of the dough is similar to the width of the machine’s roller (about 6 inches/15 cm; hold it up to the machine to check.) The ends might overlap in the center, or there might be a wide gap between them—it doesn’t matter.
- Flatten the dough again and, with the folded ends on either side, roll it through the widest setting once more.
- Continue rolling the pasta through the machine in the same orientation, once on each progressive setting, stopping twice through setting 6 for a Marcato or setting 7 for a KitchenAid machine. Feed the dough straight down into the roller instead of letting it hang off the back of the machine so it doesn’t pull or tear.
- If the dough is sticky or the surface starts to tear— this happens often with a KitchenAid, especially after setting 5—dust both sides with 00 or all-purpose flour, spreading it around evenly and removing any excess.
- Lay the pasta sheet horizontally on your work surface (if you’re using a countertop, dust it with some 00 or all-purpose flour first).
- Cut the dough into 2-inch (5 cm) squares with a bicycle pastry cutter (or eyeball them with a knife) or use a 2 ½–inch / 6-cm (for broth) round cookie cutter to cut out as many rounds from the pasta sheet as you can. Any scraps can be balled up, covered, and reused later if they’re still pliable or saved for soup.
- Fill the cappelletti: Spoon or pipe dollops of filling (recipe follows), ½ to 1 teaspoon each (depending on the size), in the center of a few pieces, leaving a generous border of dough around them. Cover the rest of the dough with a dishcloth or plastic wrap.
- If the dough feels dry, mist it with a spray bottle or add a small amount of water with your finger to half of the edges of each square or round.
- Fold the Cappelletti: Fold each square into a triangle, or each circle into a half-moon, gently pressing out the air around the filling as you do so. Once the filling is encased, press the edges firmly between your fingers once more to seal and thin out the dough.
- There are many ways to shape cappelletti, but here’s mine: Position the triangle or half-moon so the top point or curved edge is facing downward. Use your index finger to make an indentation in the center of the filling pocket—it’ll look like it’s smiling at you.
- Bring the two ends toward you in a circular motion, then overlap them slightly and pinch firmly to seal. The squares might remind you of pointed pirate hats, and the rounds of sun hats with their brims turned up. When I make large round cappelletti, sometimes I like to gently press on the filling pocket to flatten it.
- Arrange the finished cappelletti in a single layer on the prepared sheet pan. Repeat with the remaining dough and filling.
Summer Corn & Basil Filling
Makes: about 2 cups
Ingredients:
- 4 tablespoon (55 grams) unsalted butter
- 12 ounces (340 grams) fresh or frozen and defrosted sweet corn kernels, from about 4 large ears
- Kosher salt and freshly ground black pepper
- 3 ounces (80 grams) mascarpone (I prefer a very thick variety like BelGioioso or the one from Trader Joe’s)
- 1 ½ ounces (42 grams) finely grated Parmigiano-Reggiano
- ¼ cup (60 ml) heavy cream
- ½ cup (10 grams) fresh basil leaves
Method:
- In a large sauté pan or skillet, melt the butter over medium heat, then continue to stir until the butter smells nutty and starts to brown, about 2 minutes. Add the corn and season generously with salt and pepper. Cook, stirring occasionally, until tender, 5 minutes. Remove from the heat and let cool completely.
- Combine the cooled corn, mascarpone, Parmigiano-Reggiano, and cream in the bowl of a food processor. Run the machine until the mixture is smooth and creamy, about 1 minute, scraping down the side of the bowl as needed. Season to taste. Add the basil and pulse in short bursts until chopped and evenly distributed (Alternatively, add everything except the basil to a high-speed blender, purée until smooth, and transfer to a bowl. Finely chop the basil and fold it into the corn mixture.)
- Transfer the filling to a bowl or pipping bag and refrigerate until chilled, at least 30 minutes. If chilling overnight, let the filling soften at room temperature for about 30 minutes before use.
Corn Broth
Ingredients:
- 2 large Parmigiano-Reggiano rinds
- 4 large corn cobs, kernels removed and reserved for another use (like the filling)
- 1 yellow onion, unpeeled, halved, and root trimmed
- 2 large garlic cloves, peeled and crushed
- 6 springs fresh parsley
- 1 bay leaf
- 1 tablespoon (10 grams) whole black peppercorns
- 12 to 16 Cups (2.8 to 3.8 liters) cold water
- Kosher salt
Method:
- Wipe the Parmigiano-Reggiano rinds clean and grate off the top layer of the exterior.
- Add the cheese rinds, corn cobs, onion, garlic, parsley, bay leaf, and peppercorns to a large heavy-bottomed pot or Dutch oven. Add enough cold water to cover and a big pinch of salt. Bring to a boil, then immediately reduce the heat to a bare simmer.
- Cook the broth, uncovered, until golden and reduced by about half, 2 to 2 ½ hours, stirring occasionally to prevent the cheese rinds from sticking to the pot. When it’s done, strain through a fine-mesh sieve into a heatproof bowl or container, pressing as much liquid as possible from the vegetables and cheese rinds with a spatula. Season to taste.
- To store, transfer the broth to a heatproof container and cool it quickly (submerge it in an ice bath if you can). Refrigerate for up to 3 days, or freeze for up to 3 months.
To serve: Bring the broth to a gentle boil. Add your pasta—about 2 ½ ounces (75 grams) per serving—and cook, stirring often, until just shy of tender. Then turn off the heat, cover, and let stand for 2 minutes. Divide among bowls and top with black pepper.


Be the first to access new recipes, show premieres & exciting giveaways!